


We have this bathroom that is attached to our bedroom.
It’s referred to as a “master” bathroom, however, there is nothing “master” about it.
The only difference is the master bedroom has its own bathroom.
As a result, master bathroom by association.
I’d intended on redecorating this bathroom for years, but we still had the same paint from the previous owners, whom we will refer to as Claude and Mona for the sake of this post. To give you an idea, Claude and Mona haven’t lived here in nearly eight years. We still had the same storage cabinet over the toilet that they had in their master bathroom.
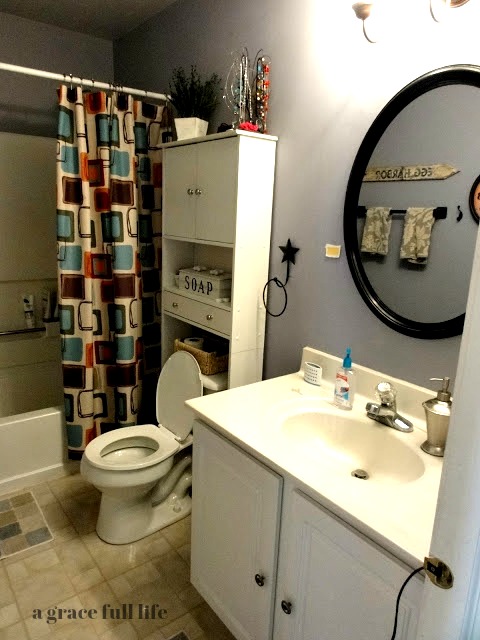
Here is a picture of my bath from 2010:


Say hello to Claude and Mona’s white cabinet.
So our bathroom had this mid-level blue color on the walls, which wasn’t horrible but it made this soul-crushingly small room appear even smaller.
We also had one of those builder-grade mirrors that took up the majority of the wall.
We ended up finding a great mirror at Lowe’s over Labor Day weekend, but before you look at the photo, let me offer a word of warning.
Monistat is on the counter.
Because, in addition to having a pretty gloomy bathroom in 2010, I must have also had a yeast infection.
And, yes, I could have edited the photo, but I preferred to remain authentic.
Because you won’t find this level of honesty on the big blogs.
Nor will you get a plug for a feminine product.

Geez, it’s almost as though I posed it there.
As if Monistat was paying me at the time.
They weren’t.
Otherwise, I wouldn’t have had to wait another two years for a decent bathroom.
Back to the mirror, it was only $12.
It was pure luck that I found it because I have yet to find another mirror at that price.
So, even after adding that mirror, the bathroom sat like this for another two years.
Apparently, I was pacing myself.
Fast forward to this summer and I told myself, “Enough!”
After seven years, we are finally making this bathroom our own. But I needed to accomplish it on a shoestring budget.
My budget was $150.
Which, I’m told, isn’t a lot for bathrooms. Sigh.
Here is what it looked like back in September 2012:

We spent $39 at Home Depot on a new light fixture to replace the dated dressing room light bulb fixture.

We found the faucet at Home Depot as well.


So we were peeling and sticking the planks and literally celebrating each time we finished a plank.
Clap! Clap! Clap!
Look how far we’ve come!
We rock!
Then we got cocky.
This is too easy!
Who in the world would pay someone else to do this?
This is something even a teenager could do!
Until we encountered a roadblock.
The toilet.

Rebecca created a template, which she then traced onto the vinyl pieces. Then I would take the knife of death utility knife and score the plank and snap it.
Then, like a puzzle, we’d try to fit it into place.
That’s when we completely lost it.
We were laughing so hard that we were crying.
And it was then that we said:
This is exactly why people pay others to do these things!
Here is a picture of me admiring my new floors while Rebecca works on the templates:


Thank you so much for your help, Rebecca!
My brother stated that it would have been simpler to remove the toilet entirely in order to install the flooring.
I informed him that I intend to replace the girls’ bathroom flooring as well, and that he should come to my house next week to assist me.
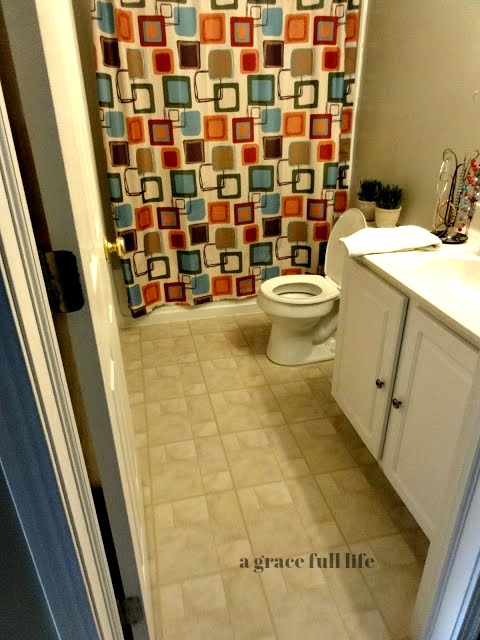
Are you ready for the big reveal?


Before:
After:

Here is a breakdown of the costs
Grand total-$ 249.75
Have you ever remodeled a bathroom on a budget? Tell me about it in the comments.

OHMYWORD I AM IN LOOOOVE!!! I have to redo our bathroom floor, the tiles are totally peeling up, i want to be a creeper and copy yours! You are awesome for putting in exactly what you used!!!
LikeLike
HOLY CRAP!!!! hahaha no pun intended? or maybe pun intended.hahaha it looks AH-mazing. i LOVE it so much. the floors are awesome. love it so much better with out the shlf over the tolete.and the meaning behind your shower curtain is SO cute…great job!!
LikeLike
@ My Blog BFF- Thank you friend! I can come over and help you with it. In exchange for wine. 😉 @ Antonia- It doesnt come up anonymous anymore!! Yay! Thanks friend, I love it so much. Probably more than what is normal. 🙂
LikeLike
It looks like you had an amazing weekend! Apple cider mini donuts sound delightful! And the bathroom!?!? Amazing! I love the before pictures… I'm notorious for leaving crap on the counter in pictures! The floor looks amazing, but I think the best part is that you have a bit of your mom in there. A girl always needs her mama!!
LikeLike
LOVE the new look! (The floor is amazing!) I'm your newest follower, and hope you'll visit and say hi :)Susan
LikeLike
Wow, I'm so impressed! My master bath is smaller…only a shower! I blogged about it November 18, 2010 if you want to look. You guys did an awesome job…it's beautiful!
LikeLike
Wow, that is such an Awesome Makeover!! Great job. I love the new faucet and those hard woods, or is it vinyl…look great! Can't believe you spent so little.JaneFF
LikeLike
That floor made all the difference! When we moved into our house, the bathrooms were carpeted. Wall to wall. Yeah, it was gross. I wish that peel and stick fake wood had been available back then. Such a quick fix!
LikeLike
I stumbled onto the site, i heart nap time and came across a link to your site and really enjoyed your bathroom remodel. my husband is in construction ergo, nothing gets done here that I don't. truly the biggest impact was the flooring and it looks AMAZING! I love your writing and the humor behind it because you sound like a friend and made me laugh. Thanks!
LikeLike
Ok. I love this bathroom. Can I have it? Please???
LikeLike
great job! I did not take the toilet out when installing ours…and yes, I did the template on paper and it looks great!
LikeLike
Aww Lucy, you sure cannot! 🙂
LikeLike
Love this! I too have a small bathroom and the flooring is horrid. Love the peel and stick you did. My question is, are you're fixtures: mirror,knobs etc. black or oil rubbed bronze?
LikeLike
Patty- you didnt leave an email to respond so I hope you come back and read this! It is oil rubbed bronze. 🙂 Thanks for stopping by!
LikeLike
Beautiful! I want to do this in my bathroom like NOW!!! Did you take your baseboards and little trim by the door off or just stick the planks down next to them?
LikeLike
Wow this is amazing! You did a really fantastic job!
LikeLike
ha ha I still have carpet in my guest bathroom ick. we don't have a lowes up here only homedepot. i have been trying to decide what kind of flooring to get for 14 yrs and by golly this is it thx 😉
LikeLike
Colleen- They do have this at Home Depot too!
LikeLike
Help! I absolutely love that shower curtain, but cannot find it at Target 😦 would you happen to have any more info on it? Beth
LikeLike
the floor looks awesome!!! I may have to look into this…I love it! I thought the same thing about removing the toilet. I sppose if I was doing it myself I'd probably convince myself to work around it but my husband's a plumber so I got the right guy to remove it for me! 🙂
LikeLike
Claude and Mona would approve…as do I! Looks awesome!
LikeLike
Anonymous- You won't be able to find it on Target.com. Did you look in store?If you can't find it, I will look it up and post the exact name.
LikeLike
Having a wooden bathroom floor is pretty unique. Not only does it look good, but it also promotes cleanliness more because people will have the discipline not to spill water on the floor because it has the tendency to warp if it’s always wet.
LikeLike
Great job! Love the floor – and your clever way of telling a story :o)
LikeLike
I love this, this is great, did I mention that I love this? I have been mulling over using Ben Pewter in my family room. I picked Baby Fawn but now after seeing your bath in 2nd guessing myself. This is a big one for me because it is not only the color for the family room, but also the 2 1/2 story entrance foyer, upstairs hall and stairwell, and part of our kitchen … gotta love open floor plans! – Jacque @theDIYvillage
LikeLike
WHat a big difference! We have Revere Pewter in our bedroom and I LOVE IT! Great color and design choices, Kari!Thanks so much for linking up and linking back last week at the Humble Brag! Even though its Black Friday, hope to see you back tomorrow to link up more great projects. Don't forget, we will be giving away more free ad space! 🙂 http://www.oneprojectcloser.com/the-humble-brag-link-party-8/Happy Thanksgiving!
LikeLike
Your bathroom is lovely! You could even add an inline water heater to your bathtub to enjoy warmer baths.
LikeLike
That looks awesome! Better idea to go with the vinyl hardwood look than real hardwood. We have real hardwood in two of our bathrooms, stupidest thing I ever saw- clearly they were not the thought of a mother who bathes her children 🙂
LikeLike
Thank you for sharing this beautiful post. I am actually very envious of you for having that wonderful autumn drive. I really love to have seen those beautiful mums with my own eyes. These are just very uplifting. Anyway, your bathroom has indeed transformed. You certainly did an absolutely amazing job, which I am certain that others as well as home builders Missouri will also appreciate. Thanks for sharing this post.
LikeLike
Great idea! I'm thinking of using this in our master bath as well! One question~how did you work around the baseboards and the flush that separates the bath floor from the next room's floor?Thank you for sharing this with us viewers;)
LikeLike
Great idea! I'm thinking of using this in our master bath as well! One question~how did you work around the baseboards and the flush that separates the bath floor from the next room's floor?Thank you for sharing this with us viewers;)
LikeLike
Did you remove the baseboard trim or just put the flooring right up to it?
LikeLike
Did you remove the baseboards? I'm going to do the same floor and really dont want to tear out the baseboards.
LikeLike
This looks amazing! How well has it held up?? Does it peel at all? Does it handle water ok??
LikeLike
I LOVE it! That flooring is exactly what I want for my whole house. How has it held up and would us use it again? Great makeover and is Rebecca still your Bestie after the event, lol? Y'all did a great job.
LikeLike
Found you on Pinterest. Awesome looking floor! How is it holding up?
LikeLike
Beautifully!But I would keep any extra strips of flooring in case you need to replace them.I haven't had to for my bathroom but just in case.Thanks for visiting!
LikeLike
I was wondering if you were going to change the shower curtain? That in itself is a great improvement, thanks for sharing.
LikeLike
I still have that curtain!
LikeLike
Hi, it’s been several years since the make over. How are the peel N stick flooring holding up?
LikeLike
Funny you should ask….I was going to take pictures to add to this post but the lighting sucked.
They are holding up surprisingly well. A few pieces came off of the area beside the toilet but we had so much left over that we just replaced it.
But other than that, they are worth every penny.
LikeLike
Which brand of flooring did you use?
LikeLike
The name is Style Selections at Lowe’s. They have many name brands to choose from but these were much less expensive.
They are called Peel and Stick Vinyl planks. They have many colors to choose from but I don’t remember the name of mine because I don’t have the box any longer just the planks. I hope this helps.
LikeLike
Did you remove your baseboards or that metal bar where the planks meet the carpet when you were installing?
LikeLike
Nope! We just butted up the peel and stick panels to the threshold. That is it!
LikeLike
Kari, not only do I love, love, love your “newest” bathroom redo, but I love your blog. You totally made me smile while reading your experience. Job well done!
I am moving into an apartment and will take this on in my “new” bathroom!
Thank you for being such a great writer!
LikeLike
Aww you are so sweet! I love comments like this.
Thank you for being a great reader. You are truly appreciated. 🙂
LikeLike
What an amazing makeover! One year after your updates in the comments, I’m wondering if it comes off if you’re intentionally trying to take it off? I have a gross dirty beige tile in my bathroom and would like to put something like this on top; the problem is, the house isn’t mine (rental) and I’d probably have to leave it the way it was if the landlord doesn’t like it. Thank you!
LikeLike
Thank you! So I have had this on my floor for almost five years now and it is still there! But it is starting to come up in places. So you could definitely peel this off. I would say this is a perfect idea for renters since you aren’t able to change the floors but I would ask your landlord to be safe. Maybe show her/him the after on this post and see if they like it. Maybe they will decide to keep it! Good luck!
LikeLike
I really like this ! Problem is I have light hardwood downstairs and old school light brown laminate upstairs. I would love to do this for my whole upstairs but I know it’ll be weird having different floors upstairs and down. Would you recommend this flooring for like a whole house? Because this looks fairly simple like I could do it myself and less expensive 🙂
LikeLike
Actually, I have light hardwood downstairs too and dark hardwood upstairs so I can relate! I wouldn’t recommend it for large well-traveled spaces because it is peel and stick at the end of the day. But maybe try it on a smaller room like a kitchen or entryway and see how it holds up. Take pictures and share them if you go ahead and do it!
LikeLike
Did you remove the baseboards to install the planks? If not can you see the planks against the baseboards? It looks great and I would love to do this to our laundry room
LikeLike
I didn’t have to remove them, just placed them right against the baseboards. You can’t even see a gap. I suppose it depends on the type of baseboard you have, but I think it will be fine no matter what. Good luck!
LikeLike
Thank you very much for sharing this post with us!! It’s very Informative for me. I like your bathroom! We just renovated our master bath & used the delta champagne bronze fixtures.
LikeLike
This looks great, I just bought some and excited to do this project! But did you cut the template from around your toilet with the utility knife and from which side? The top or bottom of the tile?
LikeLike
Yes, we cut it with the utility knife from the top of the tile. Good luck to you!
LikeLike
That is awesome work done by. It looks so beautiful and nice. Lovely work.
LikeLike
Thank you!
LikeLike