

It all started back in 2012 when I was tired of looking at this:

AND this:

The above is a kid’s bathroom for two girls, ages 12 and 4 at the time (SOB). But we wanted to update it a bit.
Here are the afters:


Pretty awesome, if I do say so myself. It cost $215 total to transform the girl’s bathroom from paint to floors and everything in between; $249 for ours as we had to replace the towel bars in addition to paint and floors and everything in between.
But the floors were the real star of the show because back in 2012, peel and stick “wood” floors were pretty much unheard of.
Which is why my posts about the peel and stick floors kind of went viral.
I can’t give you specific numbers because I didn’t keep track and I switched from Blogger to WordPress. But let’s just say that since moving this blog to its current location in July 2019, I have had 3,000 page views for the master bath post alone. A post I wrote over seven years ago. A post that I don’t promote whatsoever. That is just from Pinterest traffic alone.
So when this happened to the beloved viral floors in 2018:

I was kind of sad. Nail polish remover and laminate floors do not mix.
I couldn’t even get mad because this is something that could’ve easily happened to me. I was more upset that I didn’t have any more planks leftover in the basement.
So I decided that we were going to go another way. I wanted the printed tile that was all over the blogs, Instagram, and Pinterest.


But as pretty as they are, they were very expensive.
So the bathroom floor just sat. And sat. And sat. And sat.
For a solid year and a half.
I just shoved a rug on top of the warped and distorted floors whenever we had company.
Then, a few weeks ago while online Christmas shopping, I found these:

FloorPops Comet Peel and Stick Floor Tiles on Walmart.com (not an affiliate link, just want you to get a good deal too).
AND THEY WERE ON SALE!!
Like, 60% off what I had seen for these same kinds of peel and stick floors before.
We measured the girl’s bathroom and decided how many packages we would need: eight total packages of tiles as each package had 10 tiles with the total square footage (per package) being 10 square feet.
Is your head hurting yet? Mine too.
After recovering from all that Math-doing, ordering them online, and then waiting a week for them to get here, Mike began demo-ing the old floor in the girl’s bathroom.
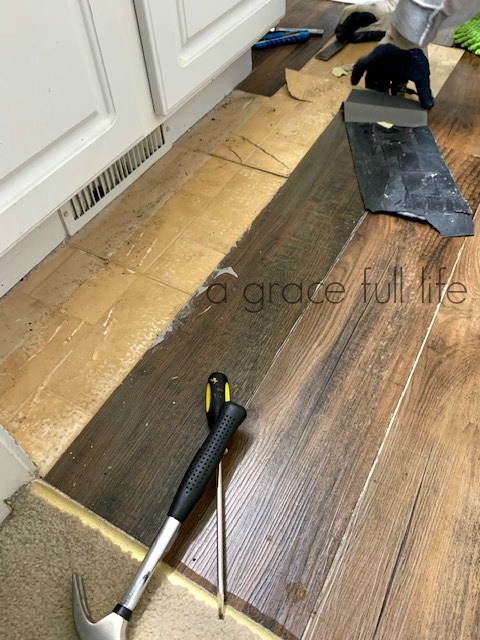
See the old linoleum under the peel and stick? The shiny you see is the old adhesive from the “wood” floors. So he had to remove the linoleum as well and go down to the subfloor.
Which was good because it turns out there was some mold under there:

It took several days to get rid of the mold and I am glad we did get the old linoleum up because who knows how long that mold had been there. The old linoleum was original to the house and was built in 2000. Also, some of that black you see was instead the builder adhesive they used to affix the original linoleum to the subfloor, to our relief.
After talking to several people at Home Depot and reading online, we learned that we could apply the peel and stick to the subfloor. Now, how long will this last? Time will tell because we didn’t use builder grade adhesive. Just the peel and stick adhesive on the back of the tiles.

So the best way to start these kinds of projects is to lay them out ahead of time to see how many tiles you will actually need. In our case, we also need to allow for user error and user error (especially when I am involved) is a higher percentage than most.
Then after doing more Math SIGH, we realized we were going to end up using 3.5 packages of tiles per bathroom.
Now, we have very small bathrooms which work to our advantage for projects like this. In fact, it was during both of the flooring projects (in 2012 and 2019) when I was actually thankful for small bathrooms.
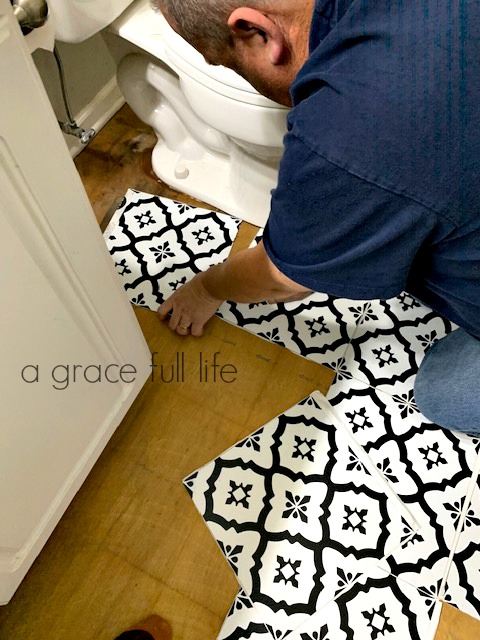
The toilet was the hardest part because of all those corners. So many crapper, shit, and poop jokes, I don’t even know where to begin, so I won’t.
2012 Kari is so ashamed of me.
2012 Kari also had two helpers with the wood peel and stick; Rebecca and preschooler Ella (SOB, again).
This time around, we had this fella:

Buddy has the keen ability to know when is the absolute worst time to want to play. Good thing I was just watching Mike do all of the work, cracking jokes to keep the mood light, and taking occasional pictures so that I could indulge our doggie.
WHAT? BUDDY NEEDED ME!

He got new jeans after this project. I know you were worried.
It took all of about two hours and this was how it looked afterward:
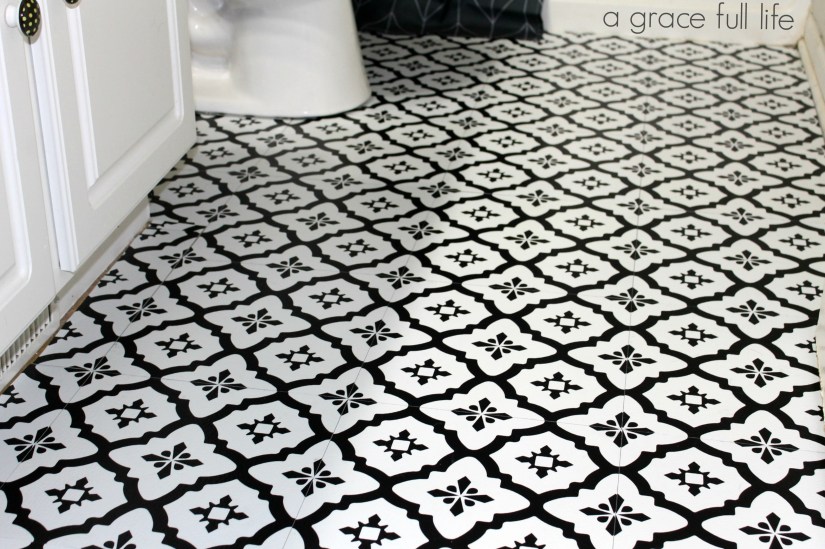
I keep staring at our new bathroom floors a lot. To make sure they’re still there. Because look how pretty our bathroom floors are!!
We also got new shower curtains because the old ones clashed with the new floors and also, the old ones are seven years old and it was probably time to change them out.
Yes, I washed them in the seven years I had them up.
Occasionally.
Ish.
So, I recently read about how buying an extra long shower curtain and raising the rod (RAISE THE RODDD) helps to make a small bathroom look bigger.
I needed new shower curtains anyway and found these really cool shower curtains on Amazon. So I ordered them (size 72×96) as well as long shower curtain liners.
Here is the before and after:
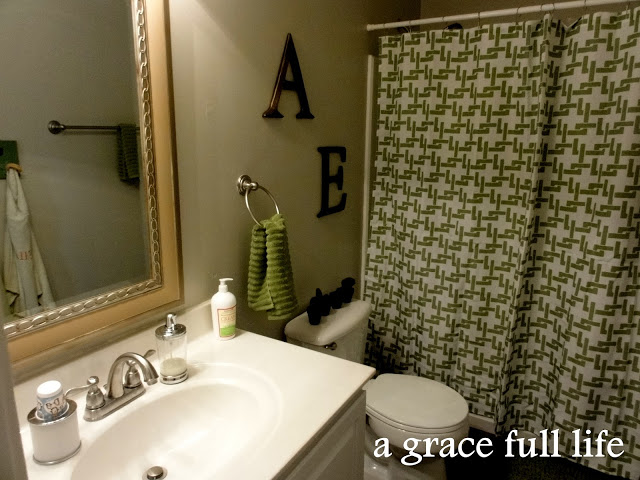

It’s kind of hard to see but it looks so much bigger in this room. Bigger than I ever thought this room would look. But also I love that when you are in the shower, it seems so much more private. Also, it totally feels like a fancy hotel bathroom.
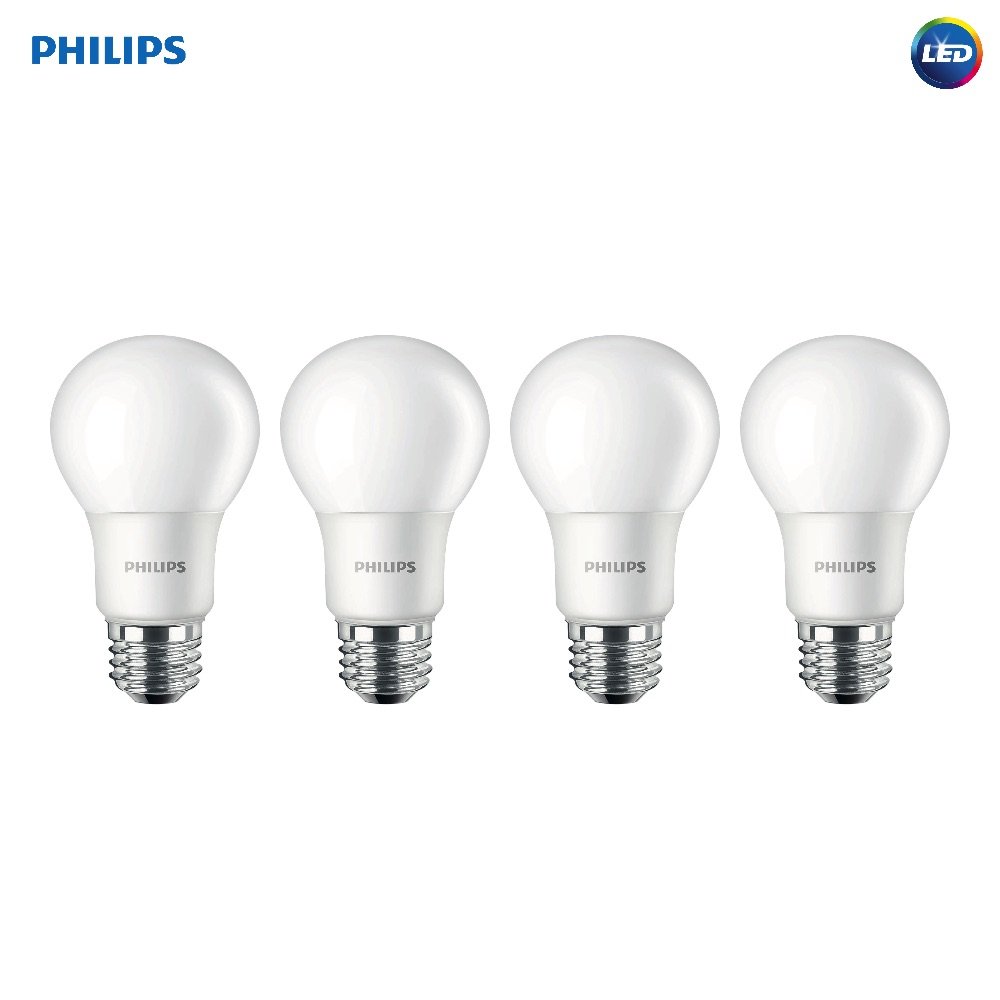
Another tip for small bathrooms, especially those that are interior and don’t have windows: LED lightbulbs! These have been LIFE CHANGERS in our bathrooms. We’ve been using LED lightbulbs in all of our bathrooms since last winter and it was the best decision ever.
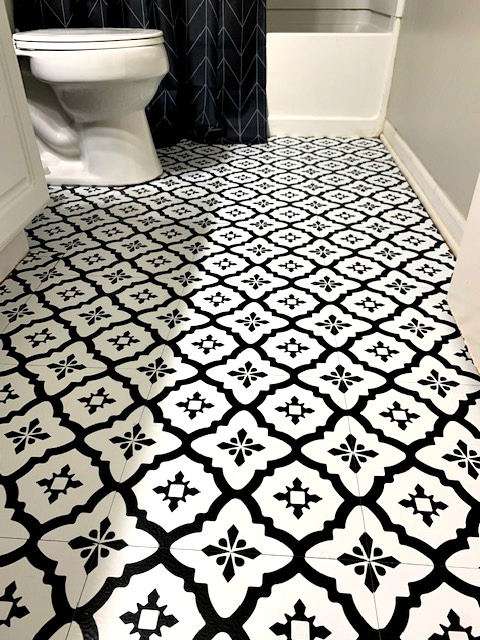
On Thanksgiving morning, my husband tackled and finished our bathroom. We didn’t have any mold in our bathroom…..probably because adults use the shower and toilet in this one.
Here is the before:
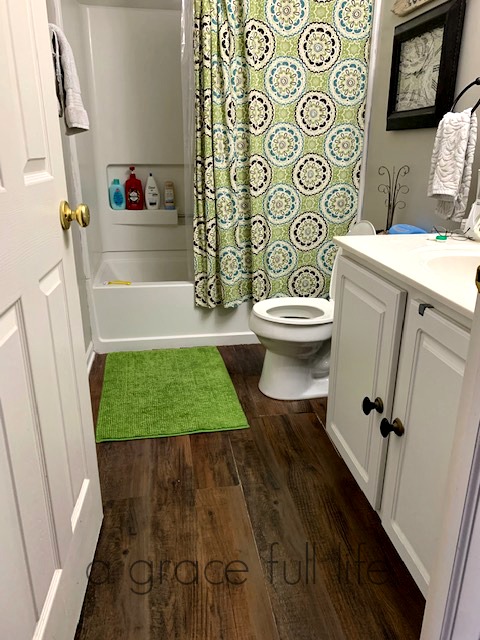
And the after:
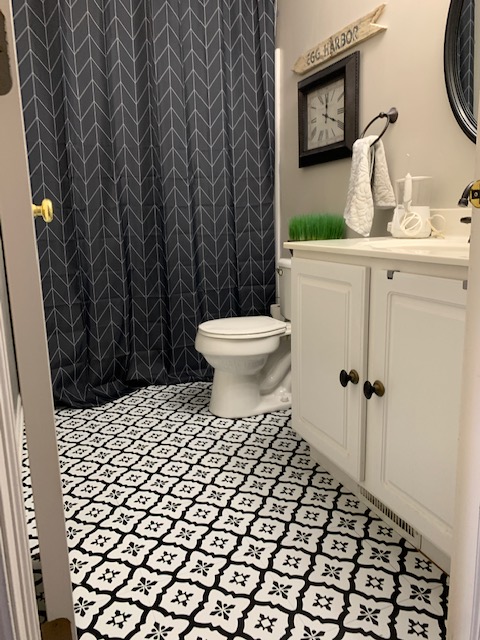
I never thought we could improve on the floors that we installed in 2012 but this is by far my favorite DIY project we’ve done in our home.
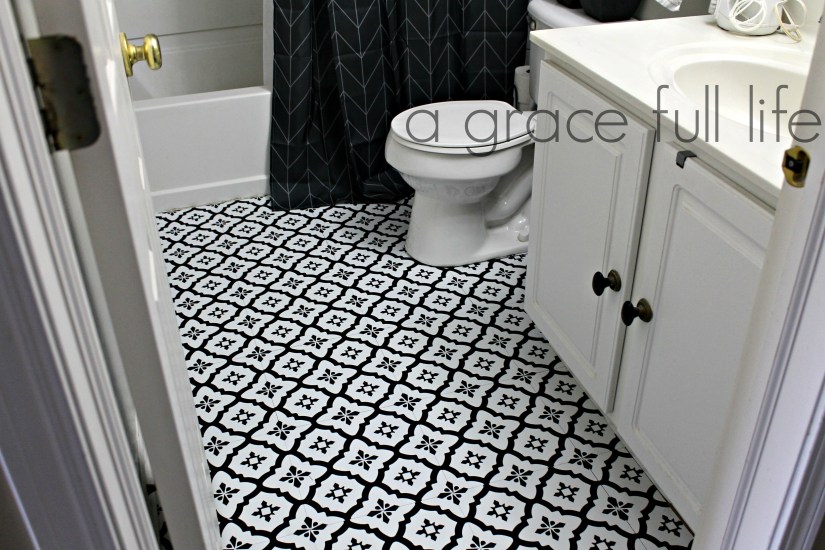
Total cost- $85 for BOTH bathrooms!! That’s less than it cost to do the floors in 2012!

This was such a great and easy way to makeover a bathroom, especially an underwhelming bathroom.

The floors look awesome! Well done!
LikeLiked by 1 person
Thank you! 😘
LikeLiked by 1 person
Amazing! Those bathrooms look awesome!!! Coach and I put a new floor in my condo before we got married. It was 1995. Peel and stick were just plain ugly. I learned that we cannot both be involved on a DIY project. It was almost a deal breaker. We look back at pics of the boys when they were tots helping Coach fix something with their plastic tools and Coach’s jeans- hilarious looking! I am guessing he still keeps a pair of those hidden away for another project. So- your hubby’s jeans did not register as strange to me.
Enjoy your luxurious looking space!
LikeLiked by 1 person
Oh, he still has those jeans! But he isn’t allowed to wear them in public again. HAHA.
I have learned we don’t do well at DIY projects together either. So play with the dog it is! 🙂
LikeLike
It looks great and we used FloorPops in July to redo on half of our basement floor. There was NO WAY it was sticking on its own especially since I found the adhesive on ours to be less than impressive. Even with heating the adhesive and using construction adhesive on a few, we got peeling. (We got the Medina white and grey or as I call it…Funky Grey Medina) Ours is on cold concrete so you might have much better luck with it being on subfloor on an interior room. I have a suggestion for under $10 to potentially save your sanity, get this Home Easy carpentry tape. (https://www.lowes.com/pd/HOMEeasy-1-875-in-x-75-ft-Tan-Double-Sided-Seam-Tape/999920702)
This was a pain in the butt to work with but a carpenter said it was a must for vinyl installation and given ours has been down on freezing cold concrete with no peeling, I have to agree. It’d be better to keep it on hand in case a corner peels up and be ready. In a pinch, you can also use a blow dryer on hot to heat up the adhesive for more stick.
Looks awesome and hope you enjoy it for many years to come!
LikeLiked by 1 person
OOH! Thank you for the tip!! We will definitely get that to have on hand. And of course, if that happens, there will most likely be a blog post to follow. 😉
LikeLike
Gorgeous! You did a great job and love your sense of humor. Will pin this post. Visiting from #UNLIMITEDMONTHYLINKPARTY. Happy Dec. Nancy Andres @ Colors 4 Health.
LikeLiked by 1 person
Thank you!! ❤️
LikeLike
Okay, I’m totally flying you down here so you can help me make my bathrooms look awesome. And the rest of the house.
We had what we thought was a bit of mold in our bathroom a couple years ago. $50 fix, or so we thought. And then started tearing up shit and there was rot everywhere from a leak. $50–>thousands, and we went from a bathroom that looked like it could be in a magazine to some basic ass stuff. Grr.
LikeLiked by 1 person
Omg that’s scary! I was worried about our subfloors but thank goodness it went away.
Also, I’ll come down and help! And I’m not at ALL motivated by warmer weather. 😂
LikeLiked by 1 person
I love this! You are so inspiring. You have got the gift, my friend. I feel like that part of my brain is missing, the one where I can look at something in the house and see something better. My only inspiration comes from other people. I’m glad I’ve got you as a constant resource!
LikeLiked by 1 person
I take my inspiration from so many places too, so it’s not all me! I love that though. Being inspired by bloggers and Pinterest and creatives. It’s pretty cool to look at a room and say that it is filled with ideas from all over. ❤️
LikeLike
Beautiful new floors! We just tackled a floor remodel project too; but all our rooms are HUGE so we have to take a break in-between projects. I love the higher/longer shower curtain; two question though– do you have light IN your shower area? Does it feel dark in there with a dark and tall shower curtain cutting out some of the light from the room?
LikeLiked by 1 person
Good question…we don’t have a light in there. But it isn’t too dark at all. Although now that you mentioned it, I wish we did have one in there. A dimmable can light! But if you’re thinking of doing it and don’t have a light in there either, it’s definitely not too dark.
LikeLike
Looks great!! I don’t know about the adhesive on these peel and stick pieces of today but I put some on a plywood floor probably 35 years ago and they stuck like crazy!! Thanks so much for linking up at the #UnlimitedMonthlyLinkParty 7. Shared.
LikeLiked by 1 person
Omg that’s insane!! In a good way. 😂
Although, they don’t make things like back in the day so we shall see how they hold up. 🙏🏻
LikeLiked by 1 person
I can’t say how they held up since then but at the time they were stuck like crazy and survived wet mopping with bleach so they were stuck pretty good.
LikeLiked by 1 person
Wow!! That’s awesome.
LikeLiked by 1 person
This looks amazing!!
I’ve wanted to do my kitchen because there is linoleum in there, so I’m going to check these out.
I love your bathrooms!!
LikeLiked by 1 person
If you do it, email pictures!
LikeLike
It’s beautiful!!!! I’ll have to take a close-up look!
LikeLike
I love it so much even though I did love those “wood” floors too. 🙂
LikeLike
The floors look amazing! And so does the bathrooms. We are getting ready to remodel our bathroom next year and I’m super excited and super nervous. Mainly because we only have one bathroom and when a girl’s gotta go….
LikeLiked by 1 person
Right?? That would be scary! These floors only took two hours to do (per bathroom). So you should be good to go (or not go, wink wink). 😉
LikeLiked by 1 person
Wow! Looks great! Who says the bathroom can’t be the most beautiful room in your home? 🙂
LikeLiked by 1 person
Thank you! I agree. 👍🏻
LikeLike